Showing posts with label CTMH Projects. Show all posts

Tuesday, October 9, 2018

October News


It's Fall, my absolute favorite season of the all!!


Fall is a season of Photo Opportunities.  The air is crisper, corn-mazes and pumpkin patches are ready for a fun family day.  And who could forget the Pumpkin Spice Latte's or Apple Cider?

Close to My Heart has everything we need to get our fall photos into albums, or even make those Halloween cards to send to our friends.  We also have several great specials this month, so keep reading to get all the info.

You can find everything on My Site!!  


October is National Breast Cancer

Awareness Month. 

In honor of Breast Cancer

Awareness month, we’ve brought back the


 Thin Cuts bundle at a 20% discount!

Show your support for loved ones and friends with

meaningful, heartfelt artwork made using these exclusive

items.

My Acrylix® Ribbon Warrior Stamp Set
and Thin Cuts Bundle


Quick and Easy Shaker Cards to Liven Up the Holiday!

Shake things up this holiday season with the
This kit contains materials for creating 12 festive shaker cards, including printed card bases, die-cut pieces, stickers, sparkly sequins, and simple assembly instructions.
Get a 20% discount when you get the
Holiday Sparkle Bundle, which pairs
the card kit with the My Acrylix® 
designed to further customize the insides of your cards.


You can also receive this delightful card kit FREE when you Host a qualifying party or sign up as a Consultant.


ADVENT CALENDAR

Make this holiday season extra joyful with this enchanting advent calendar from the brand new Cricut® Season of Joy collection. You can now purchase a custom bundle of papers chosen especially for creating this project; pair this bundle with your Cricut® collection, a few accessories, and a My Acrylix® stamp set and you’ll have everything you need to create this festive papercrafting project!
The base kit below provides the basic materials you’ll need, but you’ll need a few additional items to complete the project. If you don’t have these items already, make sure to also add them to your order:


IMPORTANT THINGS


Highlight the unique things that are important to you with The Important Things Everyday Life™ workshop. This workshop shows you how to create eight 6″ × 8″ layouts plus a title page and a closing page for an Everyday Life™ album.
The base kit below provides the basic materials you’ll need, but you’ll need a few additional items to complete the project. If you don’t have these items already, make sure to also add them to your order:


STAMP OF THE MONTH


October Stamp of the Month: Thanks & Giving


Beautiful Stamps, Amazing Discounts

Each month you can purchase a new D-size stamp set, available for one month only, for just $5. When you place an order of $50 or more in Close To My Heart products, you qualify for this special Stamp of the Month pricing.


Friday, September 7, 2018

Story By Stacy Albums

Close To My Heart
is now offering this adorable 6X6 album
by Stacy Julian.

It is called Story By Stacy!!

These are the cutest and easiest albums.  They come with a guide to help walk you through the setup and journaling, so that when you are done, you have a completed story with pictures and journaling.

Check it out:


The adorable kits come in two different album colors....

Buffalo Plaid (black and white)


or Lagoon.


I think this album would make a great fundraiser for school sports teams or clubs as well.
I would love to work with you and see if this might work for your organization too.  Leave a comment if you would like more information.

Tuesday, September 4, 2018

Memories In The Making Calendar Kit Video


This is the cutes calendar kit, and SO simple to put together.  I wanted to show you this
Memory In The Making Calendar Kit Video so you can see how adorable it is. 
Enjoy!


Monday, September 3, 2018

September News Letter - New Holiday Expressions


It's September, and that means a lot of things.  For many it is back to school time.  It also means the New Close To My Heart Holiday Expression Catalog is here!!  You will want to get a cup of coffee, or your favorite beverage, and settle into a cozy chair to spend some time looking through this exciting catalog. 

One of my personal favorites is The Color Of The Year - Sugarplum!!  It comes in cardstock, ink, dots, shimmer pen and glitter paper.  It's beautiful


If you haven't received the catalog yet, please let me know and I will be sure you get one.  Or, you can see the Online Catalog now and start preparing your wish list today. 


National Stamping Month — Memories in the Making

September 2018 Monthly Special


This year’s National Stamping Month special features the Memories in the Making Cut Above® layout kit. With this kit, you can create 13 single pages, or add a few additional products to turn this layout kit into a calendar!


This special includes two exclusive stamp sets: Memories in the Making — Days, and Memories in the Making — Months. Use these stamp sets to add months, date numbers, and other details to your calendar.

There are different sets available in this collection.  This is perfect for those who want to make several calendars for family, but only need one set of stamps, or for those who only want the layout and no calendar.


National Stamping Day: National Stamping Day is celebrated on the third Saturday in September. This year it falls on September 15, 2018 .


Bring Back My Pack - More Magical


We’ve brought back the popular Magical paper packet with updated colors and some coordinating products! You can also get a workshop kit that includes the updated paper packet together with materials to create 4 two-page layouts and 8 cards!


You've Got Class


Preserve your child’s K–12 school progress with this unique project, which includes instructions and materials for 14 single-page scrapbook layouts. This album also includes special folders made for preserving standout schoolwork and other memorabilia, making it the perfect way to preserve your memories of these formative years.


Boutique - Paper Collection of the Month


Each month, Close To My Heart will be promoting a different collection from the new Holiday Expression Catalog.  September is the beautiful new Boutique collection.  And.... Boutique coordinates beautifully with the Color of The Year - Sugarplum


September Stamp Of The Month


And who could forget there is always a great Stamp of The Month available for only $5 USD with any $50 USD purchase.   September's Stamp is the great Just Treats set.  It is just in time for all the holidays that will be upon us soon.


That are a lot of great deals in September, so be sure and check them all out.  These great products will only be available through September and while supplies last.


Friday, September 8, 2017

Split Stamping Technique

In honor of National Stamping Month, we thought it’d be fun to share with you some stamping techniques on the blog—because no crafter can ever have too many stamping tricks up her sleeve, right?

Today’s post is going to teach you what we call the Split Stamping technique.

This technique is exactly what it sounds like: You split your stamp image. There are a few different ways to do this.

One of the easiest ways is to stamp an image onto a piece of cardstock and then cut it into pieces, like the elephant below.

Cutting up an image and reassembling it on your artwork is a unique way to draw more attention to your stamping.

Another way you can “split” your stamp is with masking. Not sure what we mean by “masking”? Masking is when you cover up part of your stamp or paper before stamping an image.

Here, we attached a strip of cardstock across the center of our card with just a little bit of adhesive so it wouldn’t slide around. Next, we stamped our flowers along the top and bottom of the card, overlapping them slightly with the strip. We then carefully peeled off the cardstock strip, removed any leftover adhesive with our Rub & Remove™ eraser, painted our flowers, and then stamped our sentiment.

For a more advanced spin on this technique, try incorporating the piece of cardstock you use for the masking!

For this card, we cut both pieces of White Daisy cardstock, attached the smaller piece to the center of the larger piece with a little bit of adhesive, and then stamped our flowers over both pieces. Next, we carefully separated the smaller piece of cardstock from the larger one, painted our flowers, and popped the piece up on Bashful cardstock with 3-D foam tape. To add even more dimension, we also stamped some of the blossoms on scrap paper, painted them, trimmed them out, and then attached them over the matching blossoms with 3-D foam dots.

What do you think of the Split Stamping technique?

Recipes

4 1/4″ x 5 1/2″ Congrats Card (Vertical)

D1726 My Acrylix® Sweet Baby Stamp Set, 1385 White Daisy Cardstock, X5941 Bashful Cardstock, Z3271 Archival Black Exclusive Inks™ Stamp Pad, Z1263 Bitty Sparkles, Z3361 Whimsy Ribbon Pack, Z3132 Watercolor Paints, Z3188 Paintbrush Set, Z1979 Marvy® Uchida® LePen™ Journaling Pen

4 1/4″ x 5 1/2″ Best Wishes Card (Horizontal)

D1747 My Acrylix® Happily Ever After Stamp Set, 1385 White Daisy Cardstock, Z3271 Archival Black Exclusive Inks™ Stamp Pad, Z4014 White & Gold Twine, Z1263 Bitty Sparkles, Z3132 Watercolor Paints, Z3188 Paintbrush Set

4 1/4″ x 5 1/2″ So Happy for You Card (Vertical)

C1693 My Acrylix® Many Congratulations Stamp Set, 1385 White Daisy Cardstock, X5941 Bashful Cardstock, X5953 Charcoal Cardstock, Z3271 Archival Black Exclusive Inks™ Stamp Pad, Z1263 Bitty Sparkles, Z3132 Watercolor Paints, Z3188 Paintbrush Set

Friday, August 18, 2017

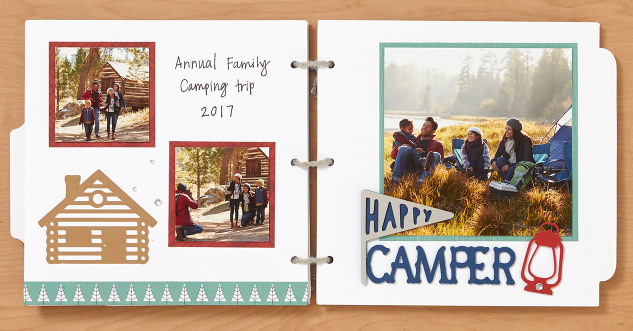
Mini Summertime Adventure Album

Can you believe summer is already coming to a close? Oh how time flies when you’re having fun! Though it may be hard to wave farewell to days lounging by the pool, visiting family, and traveling to beautiful destinations, you can keep those summertime memories alive and well by creating a mini album. Summertime doesn’t have to end!

Close To My Heart created this camping-themed album with two of their exclusive Cricut® collections: Artbooking and You Are Here.

The Artbooking collection includes a variety of tabbed, hole-punched pages designed especially for creating mini albums like this one! To decorate those pages, they turned to the You Are Here collection, which is the newest Cricut® collection. This collection includes designs to help you document your adventures both near and far away from home. Combine these two collections together, and you’ve got everything you need to create any number of mini summertime adventure albums!

You’ll see lots of the Jack paper packet in our mini album. With its tree, woodgrain, and flannel-inspired plaid patterns, these papers are perfect for documenting your outdoor adventures. Just remember, it’s only available until the end of the month while supplies last, so grab yours while you can!

If these pages inspire you to make an album of your own, feel free to refer to the recipe at the bottom of this post to see which products we used, as well as more details about the Cricut® cuts.<>

Recipe:

6″ Wander Mini Album

X7222B Jack Paper Packet, X5957 Sapphire Cardstock, X5948 Heather Cardstock, X5960 Fern Cardstock, X5979 Juniper Cardstock, X5950 Toffee Cardstock, X5978 Glacier Cardstock, X5962 Goldrush Cardstock, X5965 Ruby Cardstock, X5959 New England Ivy Cardstock, 1385 White Daisy Cardstock, Z3274 Clear Sparkles, Z1263 Bitty Sparkles, Z3095 Whisper Thick Twine, Z3169 Cricut® Artbooking Collection, Z3389 Cricut® You Are Here Collection

Cricut® Shapes:

Artbooking

3 ¼” Photo Mat 2 =1= (p. 38, Real Dial Size on)

6″ Photo Mat 1 =1= (cut 3, p. 38)

6″ Photo Mat 1 =2= (p. 39)

6″ Shift+Photo Mat 1 =@= (p. 39)

6″ Photo Mat 2 =3= (p. 40)

6″ Photo Mat 1 =3= (p. 40)

You Are Here

2 ½” Icon-2 =1= (p. 1)

2 ½” Shift+Icon-2=!= (p. 1)

1 ½” Icon-3 =4= (p. 4)

1 ½” Shift+Icon-3 =$= (p. 4)

2″ Icon-4 =8= (cut 3, p. 8)

2″ Shift+Icon-4 =?= (cut 3, p. 8)

2″ Title =8= (p. 8)

2″ Shift+Title =8= (p. 8)

1 ½” Shift+Icon-3 =?= (p. 8)

2 ¾” Icon-4 =Y= (p. 16)

2″ Shift+Icon-1 =F= (p. 24)

2 ½” and 3″ Shift+Icon-3 =F= (p. 24)

2″ Icon-1 =G= (p. 25)

2″ Shift+Icon-1 =G= (p. 25)

1 ½” Title =G= (p. 25)

3″ Icon-2 =G= (p. 25)

3″ Shift+Icon-2 =G= (p. 25)

2″ Icon-4 =B= (p. 35)

2″ Shift+Icon-4 =B= (p. 35)

1″ Icon-2 =B= (p. 35)

1″ Shift+Icon-2 =B= (p. 35)

2 ¼” Title =B= (p. 35)

2 ¼” Shift+Title =B= (p. 35)

3″ Title =B= (cut 2, p. 35)

Friday, July 28, 2017

How to Organize Years of Photos Without Getting Overwhelmed

This week, Close To My Heart shared some fantastic information on how to organize years of photos and not get overwhelmed in the process. I wanted to share this information with you as well, because it is SO important to get those photos out of boxes, off the computer, or even out of the camera, and into our lives to enjoy!

How to Organize Years of Photos without Getting Overwhelmed

When it comes to scrapbooking, one of the biggest hold-ups for people is feeling overwhelmed with organizing their photos. If you have years of photos piled up on your computer or photos spread between multiple devices, it can be easy to put off preserving your memories. The longer you wait to organize your photos, the more overwhelming it will become—so now is the time to start!

Because we believe in the importance of memory keeping, we want to help make the task easier, so today we’re going to walk you step-by-step through how to efficiently organize your digital photos for scrapbooking. It’s a process that may take some time, but which will be well worth it when your memories are all in order!

Step One: Consolidate Your Digital Photos

Upload all of your digital photos to one location on your computer. We recommend using a photo managing system, like Google Photos or iPhotos, to easily transfer photos from your phone onto your computer. If you haven’t transferred them already, go through the photos on your phone, your camera, and upload them all to this one location.

Step Two: Eliminate Unwanted Photos

Once you have all of your photos in one place, go through and eliminate any that aren’t worth keeping: repeats, photos with a blurry finger covering half the lens, photos of your to-do lists, etc.

Tip: Moving forward, make it a habit to do a Daily Delete—every day, go through the photos on your phone (or camera if you took pictures on it that day) and delete any of these types of photos. It will take you two seconds and save you tons of time down the road. You’ll be able to skip step two entirely in the future!

Another tip: Use the time traveling home from a vacation to do your deleting. That way when you get home, you’ll have already eliminated all the photos from your trip you don’t want to keep. Plus, it’s a fun way to relive those memories again while you’re heading home.

Step Three: Organize Your Digital Photos

In your photo managing system, create folders for each month and year. Then place the corresponding photos in these folders.

Step Four: Back-Up Your Digital Photos

Back up all the photos in your photo managing system onto a CD or external hard drive. You can also look into online options, such as iCloud, Dropbox, or Google Drive.

Step Five: Create To-Print Folders

Once you have organized your photos in your photo managing system, you’re ready to start thinking about scrapbooking them—woohoo! Even though all the photos you have left are photos you have deemed worth keeping, you may not want to scrapbook all of them. A great way to figure out which photos you want to scrapbook is to copy and paste a given folder onto your desktop. Then go through and delete any photos you don’t want to print. You can also edit any of the photos you’re going to print if you want to take that extra step.

Step Six: Upload & Print Photos

Once you’ve gone through all the photos on your desktop folder, you’re ready to print! We recommend creating a table, like the one below, to track each folder’s progress. When you have printed your photos, you can delete the desktop folder you created (remember, you’ve already saved these photos elsewhere!)

Tip: Choose one day every month to do a print run. Some months you may be able to afford printing more photos than other months, but get in the habit of printing your photos on the same day each month.

Step Seven: Organize Printed Photos

Option 1: Option 1: Use our large organizers and tabbed dividers to organize your printed photos.

You can organize your photos by date, person, event …whatever you want! Think about the album you want to create with the photos, and organize them that way.

Option 2: Create a work-in-progress album. Use one of our D-ring albums and divided Memory Protectors™ to separate out all the photos you’ll want for an album. You can group like photos together so you know how to plan your layouts.

And that’s it! The next step is to start scrapbooking away! If the idea of scrapbooking itself overwhelms you, a great place to start is with our Workshops Your Way® scrapbooking kits. You can also contact me to help you know where to start.

We hope this post helped you feel empowered to start organizing your photos for scrapbooking. We know that when you take that leap of faith, you’ll find so much joy and satisfaction in preserving your family’s memories and stories.

Have additional tips for organizing and printing your photos for scrapbooking? Share them in the comments below!